Types of Candle Wax Compared
By Nadia Colbert, candle maker since 2014 · Updated
Candle wax comes in a handful of families, and each one behaves differently in the pitcher, in the container, and on the shelf a month later. Soy is the default in beginner kits. Paraffin still dominates the mass market. Coconut and beeswax occupy the premium end for different reasons. This guide lays the families side by side, explains what each one is good at, and shows how to judge the wax you already have.
In this guide
The five wax families — everything you will meet, in one table.
Why soy leads the beginner category — the practical reasons, not the marketing ones.
The soy wax in the Waxwright kit — what ships and what is published about it.
Matching wax to container and purpose — a short decision path.
Melting, pouring, curing — the temperature habits that fix most problems.
The Five Types of Candle Wax
Every property that matters to a candle maker follows from molecular structure, but you do not need the chemistry to work confidently. What you need is a feel for four things: how warm the wax has to get before it melts, how well it holds fragrance, what the finished surface looks like, and how forgiving it is when you make a mistake. The table below gives all four for the families you will actually encounter.
| Wax | Source | Typical melt point | Character in use | Best suited to |
|---|---|---|---|---|
| Soy | Hydrogenated soybean oil | Around 120 to 135 °F (49 to 57 °C) | Soft, creamy set, forgiving, prone to frosting | Container candles, beginners |
| Paraffin | Refined petroleum | Around 125 to 165 °F (52 to 74 °C) depending on grade | Smooth glossy set, strong scent release, vivid color | Containers, pillars, votives |
| Coconut | Hydrogenated coconut oil | Low, often near 100 to 125 °F (38 to 52 °C) | Very soft, excellent scent carrier, usually blended | Premium containers |
| Beeswax | Honeybee comb | Around 145 °F (63 °C) | Firm, natural honey aroma, hard to scent | Pillars, tapers, unscented candles |
| Blends | Two or more of the above | Varies with the recipe | Engineered to fix one family's weakness | Production makers chasing consistency |
These ranges are the general conventions of the craft rather than measurements of any specific product. Grades vary widely inside each family, which is why the figure printed on the bag you buy always outranks a chart like this one.
A few practical consequences follow immediately. A low melt point means the candle softens in a hot car or a sunny window, which is why soft waxes live in containers rather than standing as pillars. A high melt point means a firmer candle that holds its shape but demands a wick with more pull. Beeswax carries its own aroma, which is delightful on its own and awkward under a fragrance oil. Paraffin releases scent readily, which is the main reason it survived decades of competition from vegetable alternatives.
Of All the Types of Candle Wax, Why Soy Leads for Beginners
The forgiveness point is the one that gets undersold. Soy has a wide working window between melted and set, which gives you time to stir in fragrance, position a wick, and pour without racing the clock. Higher melting waxes give you less room. A beginner who pours paraffin slightly too cool will see the surface seize before the container is full, while the same timing error in soy usually produces nothing worse than a slightly uneven top.
The cleanup point matters more than it should. Vegetable wax responds to hot water and dish soap, so a pitcher, a spoon, and a work surface come clean without solvents. Petroleum wax is more stubborn and generally wants to be scraped while warm. When you are making candles at a kitchen table rather than in a studio, that difference decides whether you pour again next weekend.
Soy has genuine weaknesses too, and knowing them early saves disappointment. It frosts, meaning a pale crystalline bloom appears on the surface as the wax recrystallizes. It can develop wet spots where the wax contracts away from the glass in patches. It generally holds a slightly quieter scent throw than paraffin at the same fragrance percentage. None of these is a defect. Frosting and wet spots are cosmetic and specific to vegetable waxes, and the throw gap narrows considerably once you get pour temperature and cure time right. The detailed walkthrough lives in how to make soy candles.
The Soy Wax in the Waxwright Kit
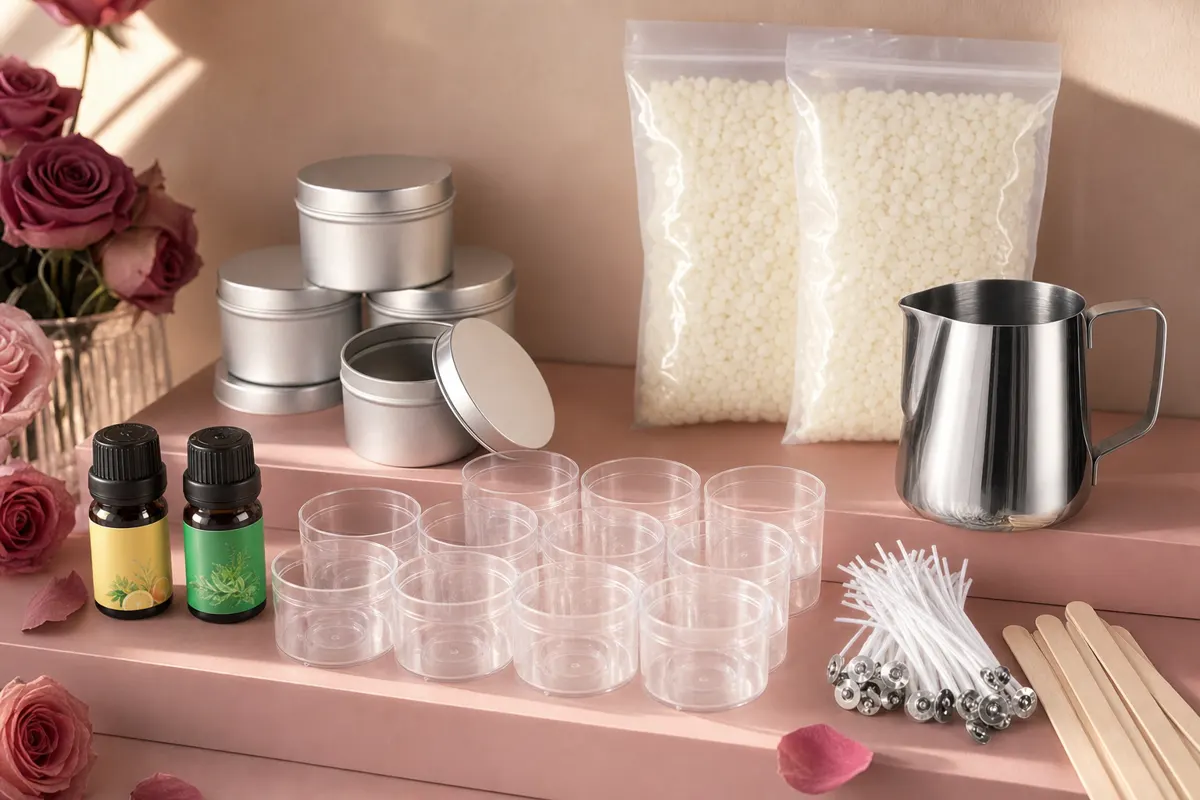
The full contents are worth reading before your first evening, because the box is designed as a closed loop. The candle making kit contains one stainless steel melting pitcher, two bags of soy wax, 50 candle wicks plus 20 extra wicks, four candle tins with lids, ten plastic candle jars, two fragrance oils in lemon and vanilla, four color dyes, two wooden centering devices, one stainless steel spoon, 56 glue dots, and a user manual. The outer box measures 8.46 x 5 x 4.9 inches, or 21.5 x 12.7 x 12.5 cm.
The stainless steel pitcher is the piece that does the real work. Its published dimensions are 3.74 x 4.21 inches, which is roughly a pint and a half of space by outside measurement, and stainless is the right material because it transfers heat evenly and takes a soapy scrub without staining. Sitting it in a saucepan of simmering water gives you a double boiler, which is the standard way to melt wax and the one method that makes overheating almost impossible.
Fourteen vessels come in the box: four candle tins with lids at 2.36 x 1.57 inches, and ten plastic jars at 1.54 inches in diameter by 0.98 inches tall. Both are narrow, which suits soy wax well, because narrow containers ask less of a wick and reach a full melt pool quickly. Two wooden centering devices hold wicks upright while the wax sets, and the 56 glue dots anchor the metal sustainers to the base.
What is not published is as useful to know as what is. There is no stated weight on the wax bags, no melt point, no numbered wick size, and no fragrance concentration for the two oils. That means the way to plan a batch is the water test: fill an empty container with water, weigh it, multiply by about 0.85, and you have your soy wax weight per candle. That method and the melt pool logic behind wick choice are covered in the candle wick size guide. Across verified buyer data for 2026, the kit holds a 4.9 out of 5 average from 105 four and five star reviews with more than 900 units sold, and buyer comments are gathered on the reviews page.
Matching the Type of Candle Wax to Container and Purpose
The shape rule is not negotiable, and it explains most of the confusion in beginner forums. A soft wax poured into a mold and released will slump under its own weight in warm weather. A hard wax poured into a jar clings to the glass, shrinks unevenly, and often cracks as it cools. Wax grades are sold specifically as container or pillar for exactly this reason, and buying the wrong grade guarantees frustration no matter how careful your technique is.
Once shape has narrowed the field, priorities decide. If maximum scent throw across a large room is the goal, paraffin and coconut blends lead. If you want a plant based candle that behaves predictably, soy is the sensible pick. If you value a natural material with its own character and do not intend to add fragrance, beeswax is unmatched, though it costs several times what soy does. If you want vivid saturated color, paraffin holds dye best, while vegetable waxes tend toward softer pastel results at the same dye load.
Cost follows a fairly stable order, with paraffin cheapest per pound, soy a step above, coconut blends higher again, and beeswax at the top. For a first project the price difference is small in absolute terms, since a few candles use a modest amount of wax. It becomes decisive only once you are pouring in volume, and by then you will have opinions of your own. The starter path most people take is soy in containers, and that is what the soy candle making kit page is built around. The candle making supplies page covers the tools that apply whichever wax you settle on.
Melting, Pouring, and Curing
Direct heat is the most common early mistake. Wax on a burner scorches at the bottom of the vessel, which discolors the batch and damages fragrance. A double boiler removes the problem entirely because water cannot exceed its boiling point, so the wax sits in a gentle bath. Stainless steel conducts that heat evenly, which is what the pitcher in the kit is for.
Temperature discipline shapes the finished candle more than any other habit. Wax that is too hot when fragrance goes in will drive off some of the scent as vapor. Wax that is poured too hot will shrink hard as it cools and can pull away from the glass. Wax that is poured too cool will set with a lumpy surface. There is a comfortable middle for every wax, and the way to find yours is to note the temperature at each pour and compare results after a week. Slow cooling helps in almost every case, so keep finished candles away from open windows and cold countertops.
Curing is simply waiting, and it is the step people skip. Soy wax keeps crystallizing for days after it sets, and fragrance keeps binding into the wax during that time. A candle lit the same evening will smell weaker and burn differently from the identical candle lit a week later. Most makers settle on somewhere between three days and two weeks for soy, with longer generally being better. If a first candle disappoints, wait before changing anything about the recipe, since patience alone fixes a surprising share of complaints.
Fragrance behavior gets its own treatment in the candle fragrance oil guide, and the full start to finish sequence is in how to make candles at home. The habit that settles most questions comes down to pouring the same recipe twice and comparing.
Working through a full box of soy is the fastest way to develop judgment about wax, which is why a kit with fourteen containers works better as a learning tool than a single trial candle. It also makes for a straightforward group activity, and the candle making kit for adults page covers that use. The kit is $49.95, marked down from $69.95, ships free, arrives in 6 to 10 business days, and carries a 30 day guarantee.